Foreign Insulators
by Marilyn Albers
Reprinted from "Crown Jewels of the Wire", September 1991, page 24
YES, YOU CAN -- AND PLEASE DO!
With a second edition of GLASS INSULATORS FROM OUTSIDE NORTH AMERICA to be
published soon, it seemed a good idea to repeat Jack Tod's instructions on how
to make shadow profiles. Very likely, some of you have a foreign glass insulator
in your collection that differs significantly in style from those already known
to us. Hopefully, we can include your insulator in the new book if you are
willing to try your hand at making a shadow profile and recording a few simple
dimensions.
Unfortunately, just the idea seems to intimidate a number of
collectors who tell themselves "I'm no artist -- I can't do that. Why, I
can't even draw a straight line! " My answer to you is "yes, you
can."
It may interest you to know that I'm no artist either, and straight lines have
always been a real hurdle to me. In my case, I did learn because I had to, but I
also had to be willing to try. I could hold a pencil, my eyes were pretty good
and I could see to trace a line and use a ruler! My little wiggly shadow
profiles and dimensions combined with Jack's engineering and drafting skills
resulted in the perfect scale drawings you see in G.I.F.O.N.A. as well as in the
two WORLDWIDE PORCELAIN INSULATORS books.
Elton Gish, who is now carrying on for
Jack Tod and possesses the same fine skills, is doing a good job of making the
final inked drawings from shadow profiles. He made all the drawings for his own
book MULTIPART PORCELAIN INSULATORS and hopefully will continue to make them
for any future needs in the hobby. I, for one, am indebted to him. Thanks for
you dedication, Elton!
Jack wrote three slightly different versions of his
instructions on how to make these profiles and so what follows has been compiled
by using the best points from each of them. Good luck, let me hear from you soon
and thanks!
INSULATOR DRAWINGS BY SHADOW PROFILE
We can make essentially perfect mechanical drawings of any insulators
remotely, without needing to see the actual specimens. It is not necessary to
loan them by mail. All we need is a "shadow profile" and a few
measured dimensions of the interior which do not show in the profile. This is
all very easy to do, and here's how to do it in very little time.
The making of
accurate shadow profiles requires a crisp shadow that can be easily traced, and
a light source far enough away from the insulator to nearly eliminate parallax
size error.
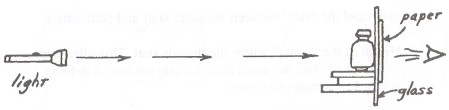
As shown in the diagram, block up the insulator perfectly vertical and
closely against a window pane of the house. Place a light source up to 20' or
more (the farther the more accurate) from the window. Tape tack a piece of
ordinary (not heavy) paper to the window pane on the opposite side from the
insulator, and trace the shadow onto the paper.
An ordinary spot flashlight with
fresh batteries gives crisp shadows even from further distances than required.
The flashlight must be placed vertically and horizontally so that the light beam
is perpendicular to the window pane. Use a small box or any rectangular object
placed against the window to sight along its edge to position the light
correctly.
Before tracing the profile, turn on the light and rotate the
insulator until its top groove is lined up with the light beam, as you will
notice by its shadow as you are turning it. You should see the widest curve of
that top groove.
Trace the shadow with a sharp pencil. Do not work in a dark
room. Ordinary room lighting will not wash out the shadow contrast on the
tracing paper, and it allows you to see where the pencil tip is moving as you
trace the profile.
We need the raw profile just as made. Do not work on it to
heavy it up or take out the wiggles in your lines, and do not sketch in any
other details or any dimension lines, etc. Just a bare profile itself!
You can
make a sketch or a second profile on separate paper for the purpose of sketching
hidden details or to aid in showing various dimensions of the insulator's
interior.
Essentially, we need no dimensions of the exterior of the insulator
which shows in the shadow profile, providing your light source is far enough
away to ensure minimum parallax error. However, it would still be a good idea to
record the width and height of the insulator just to be sure it is correct. It
is a fact that the shadow "grows" as the light comes closer and
closer! That's why it is so important to get that light at least 20' away.
Now
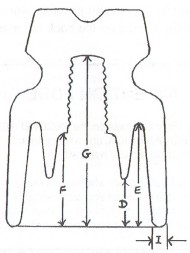
measure and record the following dimensions (See Sketch C - E for illustration)
:
A. Overall height of the insulator
B. Overall outside diameter at base of the outer skirt
C. Outside diameter of any interior petticoat(s)
D. Amount petticoat extends below the skirt, or amount it is recessed above
the skirt rim.
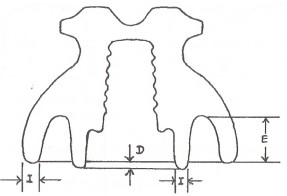
E. Height of the "slot" between the outer skirt and petticoat(s)
F. Height of the "collar" where the threads start. This often
appears as sort of a ledge, but some insulators do not have a definite collar.
In that case, disregard.
G. Height of the pinhole top
H. Approximate diameter of the pinhole and "thread pitch"
I. Thickness of skirt and petticoat(s) at their bottom ends
Make all vertical measurements from the very bottom surface of the insulator,
whether that be the outer skirt or an interior petticoat. If you are measuring a
slot depth between the outer skirt and an extended inner petticoat, measure it
only to the bottom of that outer skirt, not the inner petticoat. The depths of
pinholes, slots and collars can easily be measured by using a narrow strip of
cardboard or even a long pencil and then measuring the penetration. To measure
(or estimate) the pinhole diameter, measure the minor thread diameter near the
threads collar.
Thread pitch, or threads per inch, is helpful in attributing
foreign insulators, since a given country usually uses one thread size
throughout. England and related countries use English-unit threads (threads per
inch). Most other European countries use metric threads (millimeters per
thread). You can determine the exact thread type and its pitch as follows.
Smooth a small piece of new kitchen foil by rubbing it with your finger on a
flat surface. For large pinholes, cut a 1/2" foil strip and insert it into
pinhole. Press foil against thread with your finger. For small deep pinholes,
insert a 1/ 4" foil strip and then on top of that a 1/4" strip of
inner tube or other rubber (tweezers help here). Insert a round pencil on top of
the rubber and press hard on the rubber while rolling the pencil and slightly
rocking it back and forth. Measure from the foil the threads per inch (or twice
the number per 1/2"). As you know, standard U.S. threads measure 4 per
inch, so you can usually tell if your insulator is foreign when they number more
than that.
If the insulator has a crown groove which is dipped or cut away at
the sides, or a dimple in its crown, these features will not show in the shadow
profile. You can make a rough sketch on separate paper (not on the raw profile --
Sketch A) to show where these lines should be on a drawing. (See Sketch
B)
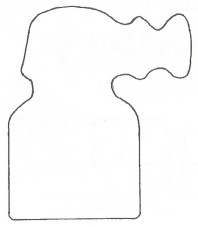
Sketch A - Raw Profile |
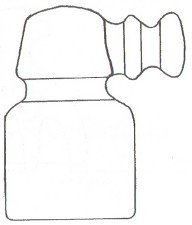
Sketch B - Crown Detail |
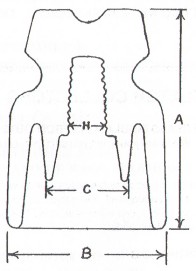
Sketch C |
Sketch D |
Sketch E |
This can all be done in the house if you prop up a piece of glass vertically
on the kitchen table and your flashlight down at the end of a long hallway.
Remember, at least 20'.
Copy all the insulator markings as best you can, and
indicate location of markings on the insulator. On porcelains, indicate type of
marking: incuse, underglaze ink, or sandblast. Good foil impressions of incuse
markings can be made by repeatedly pressing smoothed foil hard with a rubber
eraser. Dry a puddle of glue on the back for mailing.
| 
)
)
)
)
)
)